
Resources
∙
Aug 16, 2026
∙
6 minutes
Learn how to vibe code production-ready interfaces using Figma, Cursor, and Claude Code. A step-by-step guide for designers, including the AI design stack, setup, and how to make your design system AI-ready in 2026.
For the past two years, the gap between "I designed this in Figma" and "I shipped a working product" has been closing fast. In 2026, that gap collapsed. AI editors like Cursor and Claude Code, paired with Figma MCP and design tokens, let a solo designer turn a Figma frame into deployable React code in the time it used to take to write a spec doc.
This is what the community calls vibe coding, and it has changed what a designer can ship alone.
This guide covers what vibe coding actually is, the stack that makes it work, how to set it up in your Figma workflow, and the one thing most designers skip that determines whether AI produces production-ready output or generic slop.
Vibe coding is a workflow where you describe what you want in natural language and an AI editor writes the code for you, letting you iterate on output rather than syntax. The term was coined by Andrej Karpathy in early 2025 to describe a way of working where you focus on the intent and the AI handles the implementation.
For designers, vibe coding means you no longer need to hand off a Figma file, wait weeks for developer resources, or learn React fundamentals before you can ship a prototype that actually runs. You point an AI editor at your design, describe the behavior you want, and get working code back. You review, adjust, refine, and ship.
The catch is that AI editors are not magic. They generate code based on context. If you give them a screenshot and a vague prompt, you get generic output that looks nothing like your brand. If you give them your design system, your component library, and your rules file, you get output that respects the constraints of a real product. The quality of your vibe coding session depends almost entirely on what you feed the AI, not on the AI itself.
Three shifts happened in 2025 that made vibe coding practical for designers rather than a novelty for developers.
First, AI editors became genuinely good at frontend code. Cursor and Claude Code can now write React components with proper accessibility attributes, TypeScript types, responsive behavior, and consistent styling. Two years ago, AI-generated code needed heavy rewriting. Today, it needs review.
Second, Figma released MCP (Model Context Protocol) support, which lets AI editors read your Figma files directly. Instead of describing what you designed in words, the AI can see the actual layers, components, variables, and structure. This removes the biggest bottleneck in the design-to-code handoff.
Third, design systems built with native Figma variables and semantic tokens became the norm. When your design system uses meaningful names like color/text/primary instead of raw hex values, AI can map those tokens to CSS custom properties automatically, keeping your brand consistent across every generated screen.
The result is a workflow where a designer can go from concept to deployed prototype in a single afternoon. Not for every product, and not without review, but for landing pages, internal tools, MVPs, and design system components, it works.
The vibe coding stack has four layers. Each solves a specific problem, and skipping any one of them degrades the quality of the output.
AI editors are the interface where you write prompts and receive code. The two dominant options for designers are Cursor and Claude Code. Cursor is a fork of VS Code with AI built into the editor itself, which makes it feel familiar to anyone who has used a code editor before. Claude Code runs in your terminal and is built around agentic workflows where the AI takes multiple steps to complete a task. Both work well. Cursor has a lower learning curve for designers new to coding tools. Claude Code is more powerful for complex tasks like refactoring or building entire features from scratch.
Figma MCP is the bridge that lets AI editors read your Figma files. Enable it by switching to Dev Mode in your Figma Design file and clicking to enable the MCP server in the right sidebar (requires Dev or Full seat on a Professional plan). Once enabled, connect it to your AI editor, and the AI can see the exact layers, variables, auto-layout settings, and component structure of any frame you point it at. Before MCP, you had to describe your design in words or paste screenshots. With MCP, the AI reads the source of truth.
Design tokens and variables are the foundation of any output that respects your brand. Figma Variables (introduced in 2023, stabilized in 2024, now the industry standard) let you define colors, spacing, typography, and radii as reusable values with semantic names. When exported as CSS custom properties, these tokens become the bridge between your Figma file and the code the AI generates. Without tokens, AI hardcodes values and your output looks like every other generic AI dashboard.
Component libraries provide the vocabulary the AI uses to build interfaces. You have three options here. Open-source libraries like shadcn/ui and Radix UI give AI editors a well-known component API to work with. Custom design systems built in Figma give AI editors your specific components, but only if they include rules and token files that tell the AI how to use them. Premium UI kits like Beyond UI, Untitled UI, or Frames X sit in between, providing production-ready Figma components paired with rules and token files that AI editors can consume.
Here is the exact setup that works in production. It takes about 15 minutes if you have never done it before.
Download Cursor from cursor.com or install Claude Code from claude.com/code. Both require an account. Cursor has a free tier that includes basic AI features. Claude Code is included in every paid Claude plan (Pro at $20/month, Max, Team, Enterprise), but is not available on the free plan.
For designers new to code editors, start with Cursor. The interface is closer to what you already know from tools like VS Code, and the AI features are surfaced through familiar UI patterns.
The Figma MCP server requires a Dev or Full seat on a Professional plan or higher. Free personal plans do not support it. If you are on a free plan, upgrade before continuing.
Install and open the Figma desktop app (MCP does not work in the browser version). Open a Figma Design file (Make files and FigJam files are not supported yet). With nothing selected on canvas, click the toggle switch in the top toolbar to switch to Dev Mode. In the right sidebar, click to enable the MCP server.
Figma displays a confirmation message at the bottom of the screen confirming the server is running, along with a "Copy URL" button. The endpoint is http://127.0.0.1:3845/mcp. Click Copy URL and keep it handy for Step 3.
Note: this is the "local" Dev Mode MCP server that runs on your machine. Figma also offers a remote MCP server for enterprise use cases, but the local server is what most designers use.\\
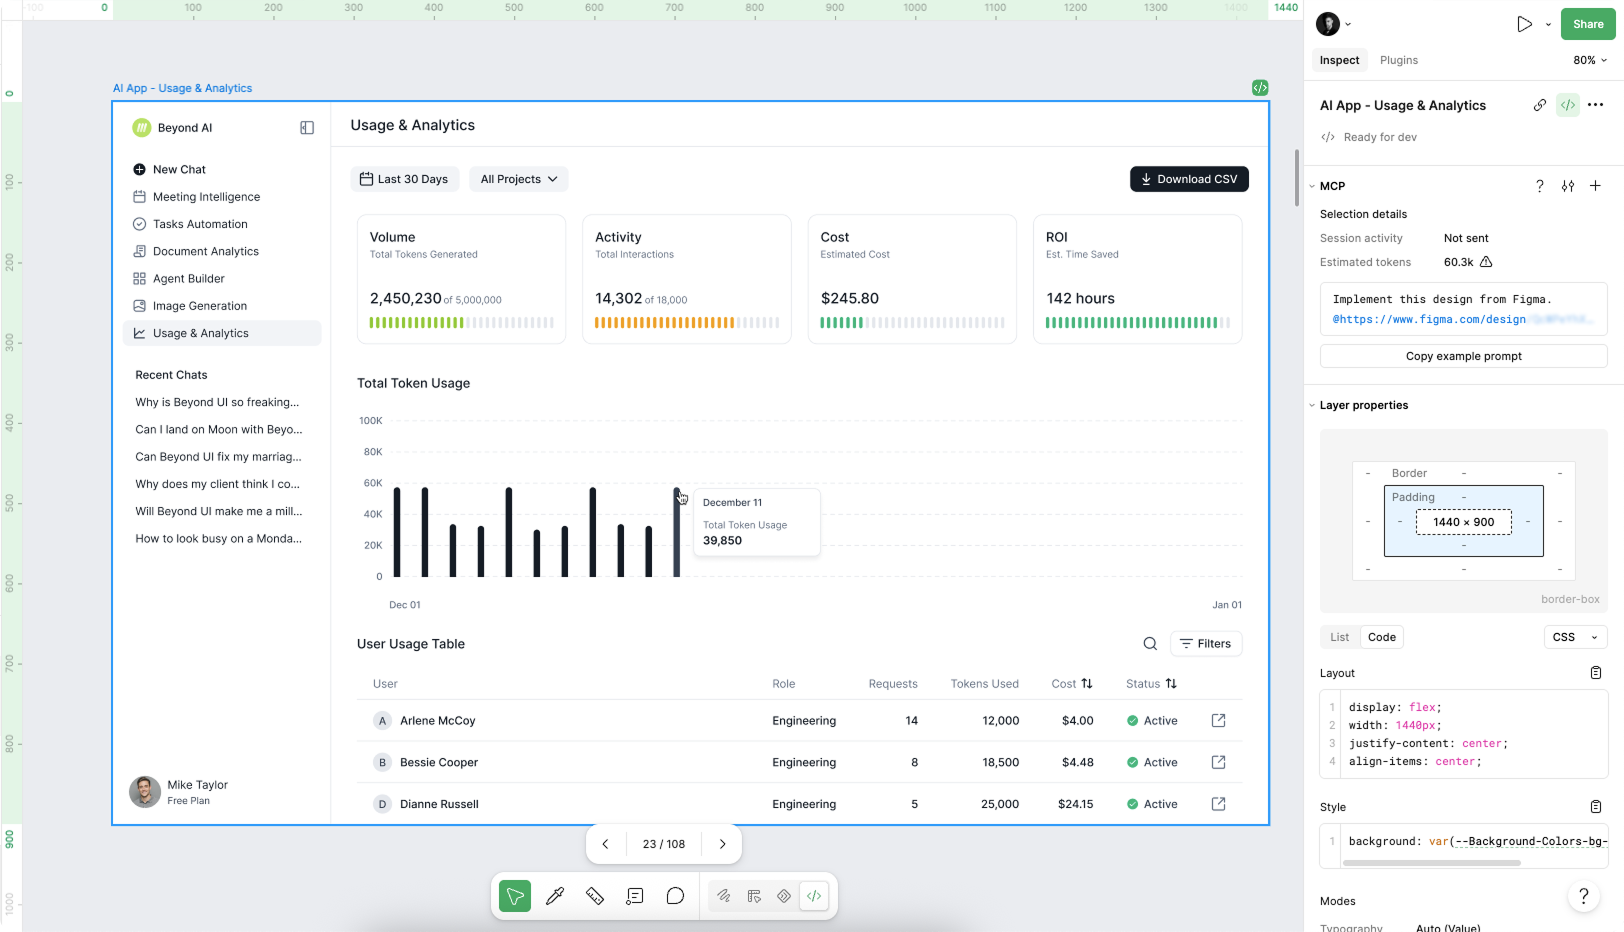
In Cursor: open Command Palette (Cmd+Shift+P on Mac, Ctrl+Shift+P on Windows), search "MCP: Add Server". Give it a name (e.g., "Figma Dev Mode"). Paste the URL you copied in Step 2: http://127.0.0.1:3845/mcp. Save. Alternatively, edit your Cursor MCP config file directly.
In Claude Code: run this command in your terminal from any directory: claude mcp add --transport http figma http://127.0.0.1:3845/mcp. This is the recommended way. If you prefer editing config files directly, MCP servers can be defined in ~/.claude.json (user scope, all your projects) or .mcp.json at your project root (project scope, shared with your team). After adding the server, restart Claude Code so it picks up the change. Verify with the /mcp command inside a session.
Once connected, your AI editor can read any Figma Design file you have open in the desktop app. Test it by asking the AI to describe a selected frame. If it responds with details about your actual layers, components, and variables, MCP is working.
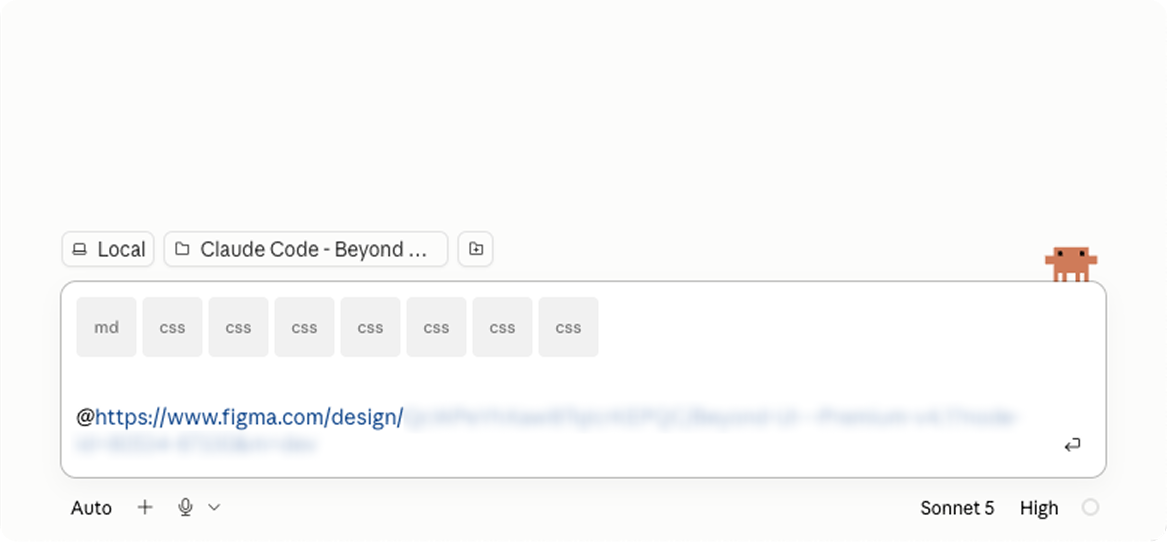
This is the step most designers skip and it is the difference between generic AI slop and output that looks like your product. It has two parts, and both are required.
Rules files tell the AI how to think about your design system. Every AI editor supports a rules format that gets prepended to every prompt.
For Cursor, the current format (as of Cursor 0.43+) is .cursor/rules/*.mdc files in your project. Each .mdc file is Markdown with a YAML frontmatter that controls when the rule activates (always, on specific file patterns, or agent-requested). The legacy single .cursorrules file at the project root is deprecated and is ignored by Cursor Agent mode (which is the default in 2026). If your UI kit still ships a single .cursorrules file, you may need to migrate its content into .cursor/rules/.
For Claude Code, the format is CLAUDE.md at the project root (or under .claude/). Claude Code reads this file at the start of every session. For more modular setups, you can also use .claude/rules/ with path-scoped rules.
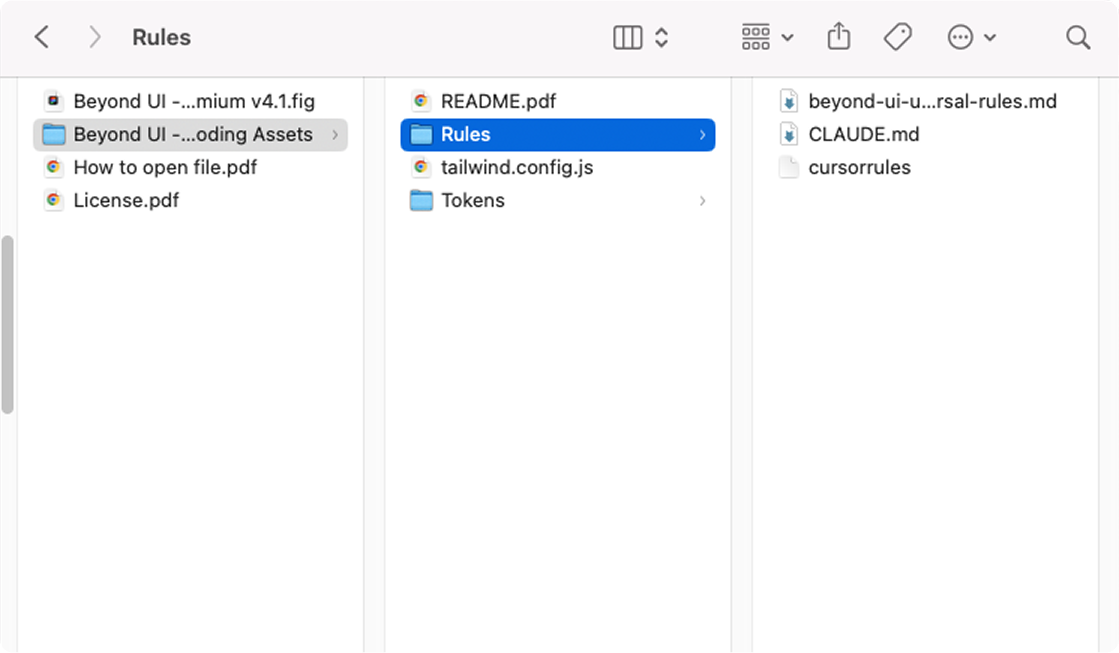
AGENTS.md is a newer portable format that both Cursor and Claude Code (and other tools like Copilot) read natively. It is plain Markdown with no editor-specific syntax. If you want one rules file that works across every AI editor, AGENTS.md is the choice.
Token files give the AI the actual values to use. A CSS token file exports your Figma Variables as CSS custom properties. A Tailwind config exports the same tokens in Tailwind format. Without these, the AI knows it should "use your primary color" but has no idea what that color is, so it hardcodes #3B82F6 and design drift begins.
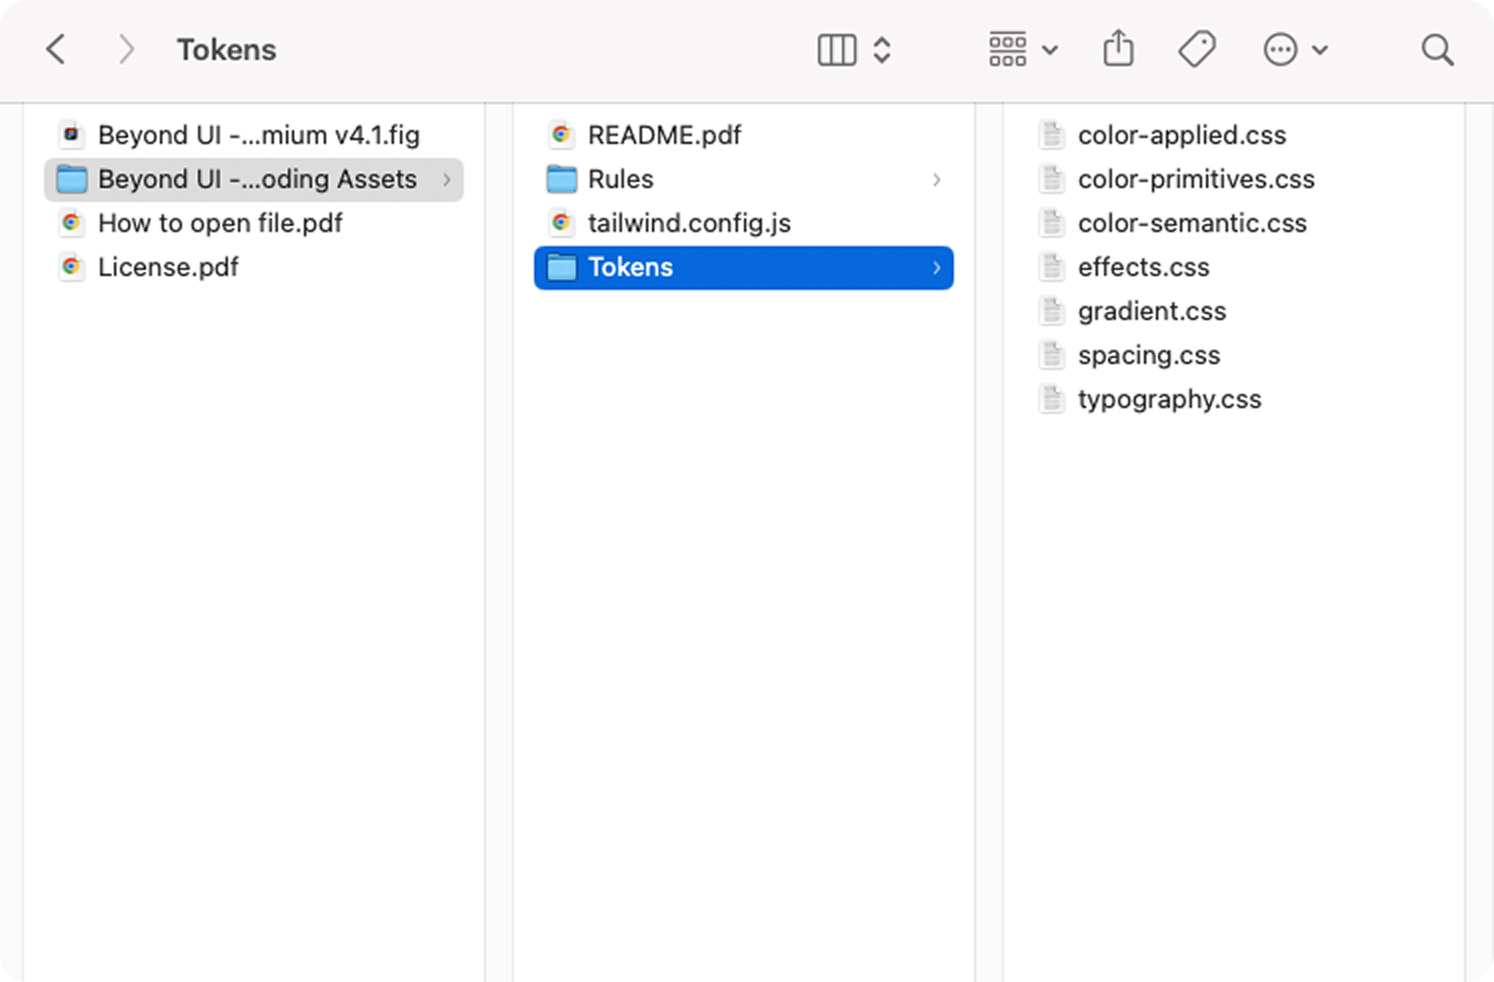
Together, rules tell the AI what to do, tokens tell it what to use. Miss either one and the output degrades.
If you built your own design system, write these files yourself. If you use a premium UI kit, check whether the kit ships with pre-written rules and token files. Beyond UI, for example, includes five files in every Standard and Premium plan: a rules file for Cursor, CLAUDE.md for Claude Code, beyond-ui-rules.md as a universal rules reference, a universal CSS token file, and a Tailwind config. You attach them to your AI session and the AI immediately understands the component library, token system, and conventions.
Once rules and tokens are attached, the AI treats your design system as constraint. When you ask for a button, it uses your button component with your semantic color token. When you ask for a dashboard, it uses your color tokens, your spacing scale, and your existing layout patterns. The output looks like your product, not like a Tailwind template.
Setup is done. Now you actually use it. This step matters because a great setup with a lazy prompt still produces mediocre output.
In Cursor:
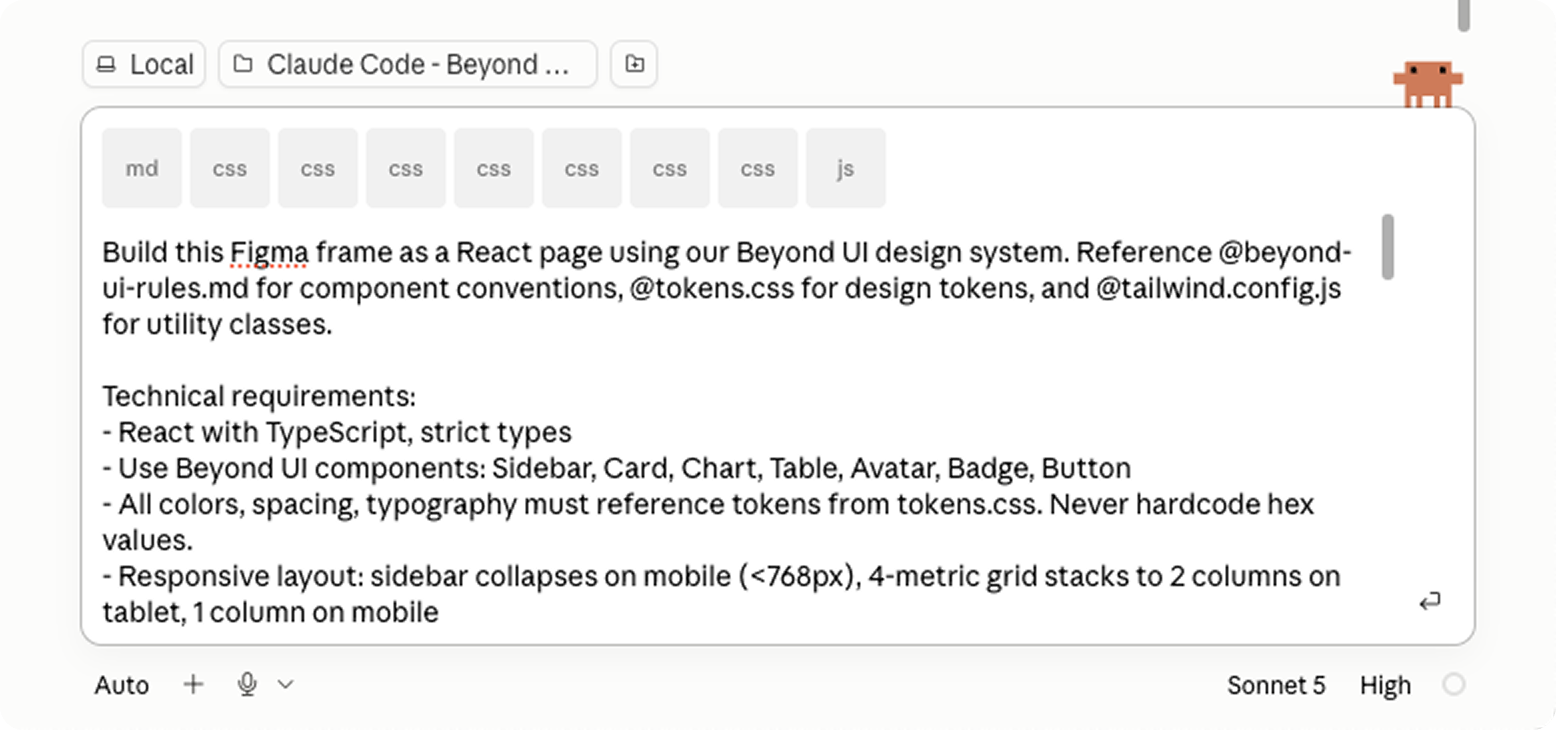
Open Cursor in the root folder of your project. Rules in .cursor/rules/ load automatically based on their frontmatter (always, on matching file patterns, or agent-requested). For your CSS token file and Tailwind config, keep them in the project (typical locations: /styles/tokens.css, /tailwind.config.js) and Cursor reads them as part of the workspace. If you want to be explicit in a specific prompt, reference them with @tokens.css or @tailwind.config.js inline. Open the chat panel, paste the Figma URL of the frame you want to build, and write your prompt.
In Claude Code:
Open Claude Code in the root folder of your project. CLAUDE.md loads automatically. Attach the other files at the start of your session using @-mention: @tokens.css, @tailwind.config.js, @beyond-ui-rules.md. This tells Claude Code which files matter for this session. Then paste the Figma URL of the frame, or use @-mention to reference a Figma resource if MCP is set up to expose them that way.
Anatomy of a prompt that works:
Lazy prompt: "Build me a dashboard."
What you get: generic Tailwind dashboard that has nothing to do with your product.
Good prompt: "Build this Figma frame as a React page using our design system components. Use TypeScript with strict types. Follow the layout in the frame exactly. Use tokens from tokens.css for all colors, spacing, and typography, never hardcode values. Import components from our Beyond UI library (Button, Card, Table, etc). Make it responsive using our breakpoints."
What you get: a working page that respects your brand, uses your components, references your tokens, and matches the Figma layout.
The pattern is: tech stack (React, TypeScript) + design system reference (tokens.css, component library name) + explicit constraints (no hardcoded values) + layout requirements (match Figma, responsive). Six lines of prompt saves you an hour of fixing AI output.
Keep iterating from there. "Move the sidebar links to a config file." "Use Recharts instead of Chart.js." "Extract the stat card into a reusable component." Each iteration takes seconds because the AI already has the full context of your design system.
And here we go, our generated screen with just single prompt
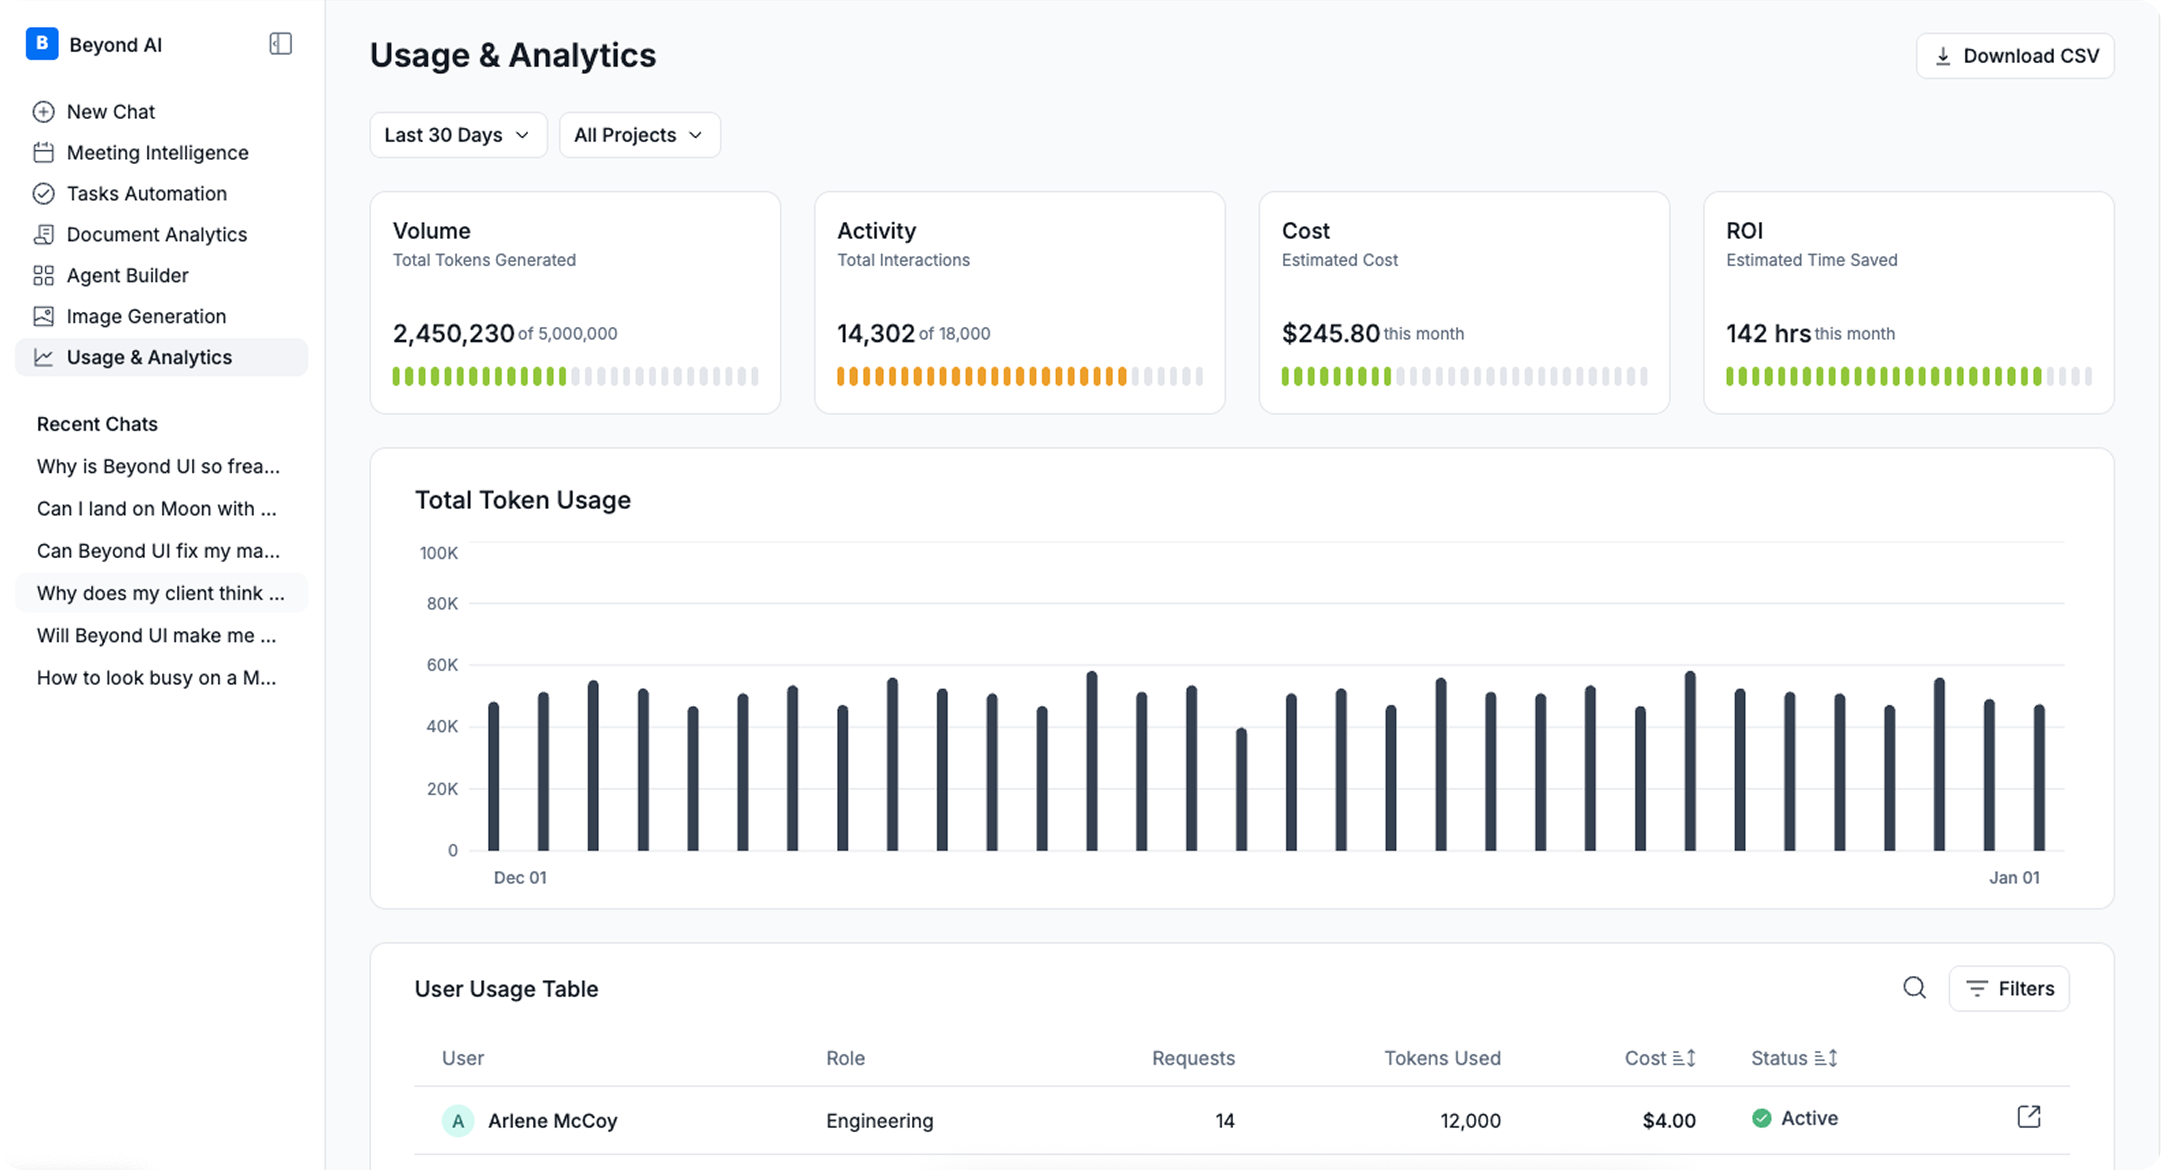
Without a design system, AI editors default to what they know best from training data: generic Tailwind, shadcn/ui defaults, hardcoded hex values, and inconsistent spacing. The output works, but it does not look like anything specific. Every AI-generated dashboard looks like every other AI-generated dashboard.
This is called design drift, and it compounds over time. Your first generated component uses #3B82F6 for the primary color. Your second uses blue-500. Your third uses --primary-color. Your codebase now has three different ways to reference the same color, none of them synchronized with your Figma file. When you decide to change the primary color, you spend an afternoon hunting down every instance.
A design system fixes this at the source. When your tokens are semantic (color/action/primary instead of blue-500) and your components reference those tokens instead of raw values, AI editors have exactly one correct way to build any interface. The primary button uses color/action/primary. The primary link uses the same token. When you change the token value in Figma, every generated component updates automatically on the next export.
The economics are simple. Time spent setting up a proper design system upfront is repaid tenfold in AI output quality. A one-hour investment in semantic tokens saves you weeks of fixing drift later.
Not every design system works with AI editors. The ones that do share five properties.
Semantic token names. Tokens describe intent, not appearance. text/subdued works across light and dark themes. text/gray-600 breaks the moment you add a dark mode. AI editors respect the naming you give them, so meaningful names produce meaningful output.
Complete component states. Every component should include all interaction states: default, hover, active, focus, disabled, empty, loading, and error. When AI generates a form field, it needs to know how the error state looks. If your Figma file only shows the default state, AI invents the rest.

Rules files. A markdown file (or directory of files) that documents which components exist, when to use them, what naming conventions to follow, and what patterns to avoid. Cursor uses .cursor/rules/*.mdc files. Claude Code uses CLAUDE.md. Both editors also read AGENTS.md as a portable cross-tool format. The legacy .cursorrules single file is deprecated and ignored by modern Cursor Agent mode.
CSS or Tailwind token exports. Figma Variables live in Figma. Your code lives somewhere else. The bridge is an export file that converts Figma tokens into CSS custom properties or a Tailwind config. Some Figma plugins do this automatically. Some UI kits ship with the export files already generated.
Documented anatomy. Each component should have a plain-English description of its structure. What is inside it, how the pieces relate, when to use which variant. AI editors treat this documentation as gospel. If your Alert component has a documented left icon slot, AI puts the icon there. If it does not, AI puts the icon wherever it feels natural, which is usually wrong.
Beyond UI was designed with these five properties in mind because it targets exactly this workflow. Any other premium UI kit or custom design system that meets these criteria works equally well. The properties matter, not the specific product.

Vibe coding fails predictably in five ways. Knowing them saves you weeks of frustration.
Design drift between Figma and code. You update a token in Figma. The code does not update. Fix: automate your token export so every Figma publish triggers a CSS export. Tools like Tokens Studio, Style Dictionary, or a custom script solve this.
Hardcoded values instead of tokens. You accept AI output without checking whether it used semantic tokens or raw hex codes. Fix: attach both a rules file AND a CSS token export to your AI session. The rules file forbids hardcoded values (add an alwaysApply: true rule in .cursor/rules/ for Cursor, or a line in CLAUDE.md for Claude Code), the token file provides the semantic values to use instead. Without the token file, the AI has no choice but to hardcode because it does not know your actual values.
Generic components instead of your system. You ask AI to "build a button" without specifying which button. It generates a generic Tailwind button instead of using your Button component. Fix: reference your components by name in every prompt. "Use the Button component from our design system with variant=primary."
Skipping the design system layer. You try to vibe code from screenshots or vague descriptions instead of proper Figma files with variables. Output quality drops dramatically. Fix: invest the upfront time to build a real design system with tokens. Or use a premium UI kit that ships with one.
Over-relying on AI for architectural decisions. AI can generate individual components brilliantly. It cannot decide your information architecture, your user flows, or your product strategy. Fix: use AI for implementation, not for design thinking. The strategic decisions stay with you.
You need basic familiarity with the concepts. Understanding what a component is, how imports work, and what a file structure looks like helps you review AI output critically. You do not need to write code yourself. You need to read code well enough to spot when it is wrong.
Realistically, plan to spend a weekend learning the basics of React and file organization before you start vibe coding seriously. Free resources like the React docs and freeCodeCamp cover everything you need in a few hours.
Start with Cursor if you have never used a code editor. The visual interface feels like other design tools, and the AI features are surfaced through familiar UI patterns.
Move to Claude Code once you are comfortable and want more agentic workflows. Claude Code runs in your terminal and is built for tasks where the AI takes multiple steps autonomously (like "refactor this entire feature to use the new component"). More powerful, higher learning curve.
Both work with Figma MCP. Both support rules files (Cursor uses .cursor/rules/*.mdc, Claude Code uses CLAUDE.md, both support the portable AGENTS.md). The choice is about interface preference, not capability.
Figma Make (launched in 2025) is Figma's built-in vibe coding tool. It runs on Claude and generates code from Figma frames without leaving Figma.
Figma Make is great for prototypes you want to keep inside Figma. It is not a full replacement for Cursor or Claude Code if you want to ship production code, integrate with a codebase, or work with a custom design system that lives in your own repo.
For most designers, the workflow is complementary. Use Figma Make for internal prototypes and quick tests. Use Cursor or Claude Code with Figma MCP when you need production output that lives in your product repo.
Any UI kit built with Figma Variables and complete component states can work. The question is how much setup you have to do yourself.
UI kits without AI-ready assets (no rules files, no CSS token exports, no documented anatomy) work but require you to write those files yourself before AI can use them. Kits designed for vibe coding (Beyond UI is one example, but others are emerging) ship with those files pre-built, so setup takes minutes instead of hours.
If you are building your own design system, plan to write the AI assets yourself. The five properties in the earlier section are your checklist.
Depends on your baseline. If you currently hand off Figma files to developers and wait days or weeks for implementation, vibe coding compresses that to hours. If you currently code everything yourself, vibe coding compresses the implementation time by 3-5x for standard patterns (dashboards, forms, landing pages) and 1-2x for novel or complex features.
The bigger win is not raw speed. It is that a solo designer can now ship real products without a developer bottleneck. That changes what is possible at the individual and small team level.
The 15-minute path to your first vibe coded interface: install Cursor, enable Figma MCP (needs Dev/Full seat on Professional plan), connect them, attach a rules file and a CSS token export, point the AI at a Figma frame, and iterate.
The 15-day path to a real workflow: audit your Figma file for tokens and component states, add missing ones, generate a CSS token export and a Tailwind config, write your rules in .cursor/rules/*.mdc (or CLAUDE.md for Claude Code, or AGENTS.md for portable) that documents your system, and practice on internal projects before customer-facing work.
The 15-week path to mastery: build a habit of designing with vibe coding output in mind from the start. Write descriptions of every component. Keep your token system semantic. Iterate on your rules based on what AI gets wrong. Within a quarter, you will ship production code faster than you thought possible as a designer.
Vibe coding is not a threat to design. It is design with a new instrument. The designers who learn to play it now will define what product design looks like for the next decade.
%20(1)%20(1).png)
Share post


